名称、概要
国土交通省の「営繕工事写真撮影要領(令和3年改定版)」の項目入力をエクセルを用いて簡単操作で作成できる無料の工事記録写真台帳(工事写真台帳)です。
新築(外構・植栽・舗装含む)・改修・撤去解体、建築・電気設備・機械設備・耐震診断に対応しています。
写真は1枚ごとは勿論、フォルダ内の写真をマウスでドラッグして複数指定する貼り付けにも対応しています。
撮影項目は撮影要領に準拠していますので、日々の作業の省力化と品質向上が期待できます。
ダウンロード:
| 工事記録写真台帳(工事写真台帳).Zip | Macで解凍できない報告があり、7zipで圧縮しなおしました。 | |
| 工事記録写真台帳(工事写真台帳).xlsm | 解凍操作不要でタブレット向けです。 | |
| 工事記録写真台帳(工事写真台帳).xlsx | 職場のセキュリティの都合でマクロ付きファイルのダウンロードが制限されている場合は写真張り付け機能が無い xlsx をダウンロードしてください。 |
カートに入れなくてもダウンロードできます。
- ダウンロードすると各種警告が表示します。心配ならシステム管理者に問合せしたり、ウイルスチェックをしてください。マクロを使用していますので、同様の手順を踏んで活用してください。
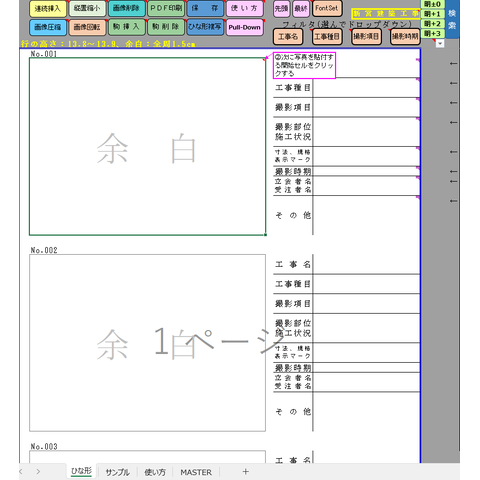
- 操作パネルの説明
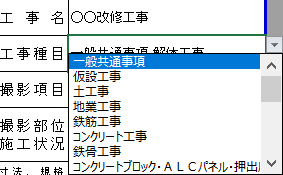
①画面右上のドロップダウンリストから工事種別を選択します。
②写真を貼付(ちょうふ)する開始セルをクリックします。
③連続挿入のボタンをクリックします。
④シート内の全画像の解像度を落とします。数十分の1になります。
⑤最近の写真データはランドスケープ(横長)とポートレイト(縦長)の情報が入るようになりました。貼り付けた写真はその情報を読み取り、自動で貼り付けます。意図した大きさになっていない時に写真を選択後に「縦置縮小」ボタンをクリックすると枠内に入ります。
⑥縦向きで撮影した写真が横長に貼付された場合は⑤と併用して画像回転します。

- 写真を貼り付ける先頭のセル位置をマウスで指定してから「連続挿入」ボタンをクリックします。
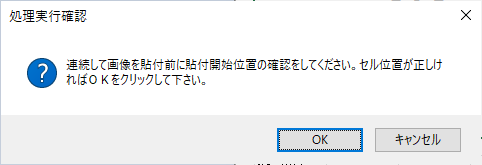
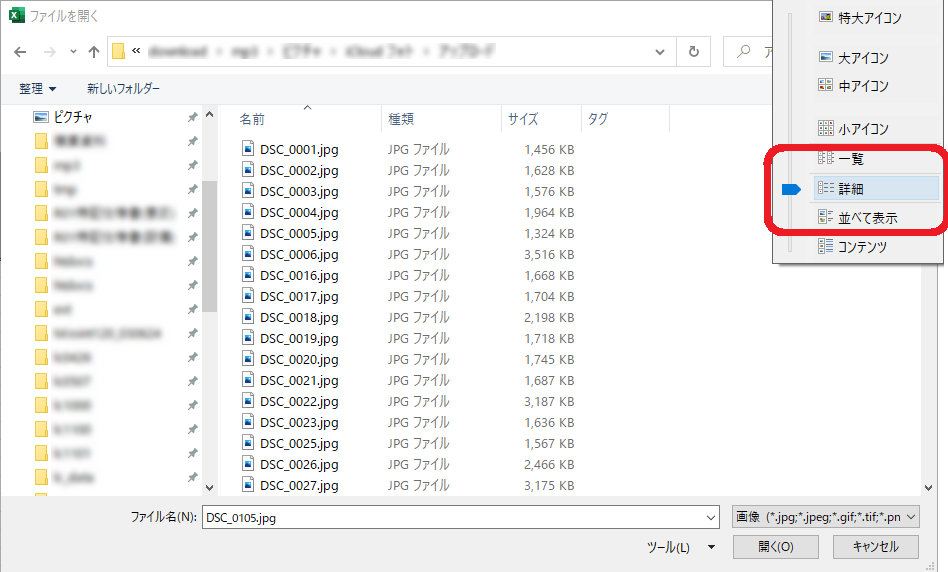
- 手順2.でOKボタンをクリックすると写真を選択する画面が開くので、マウスドラッグしやすいようにファイル一覧表示を次の画像の手順で変更します。
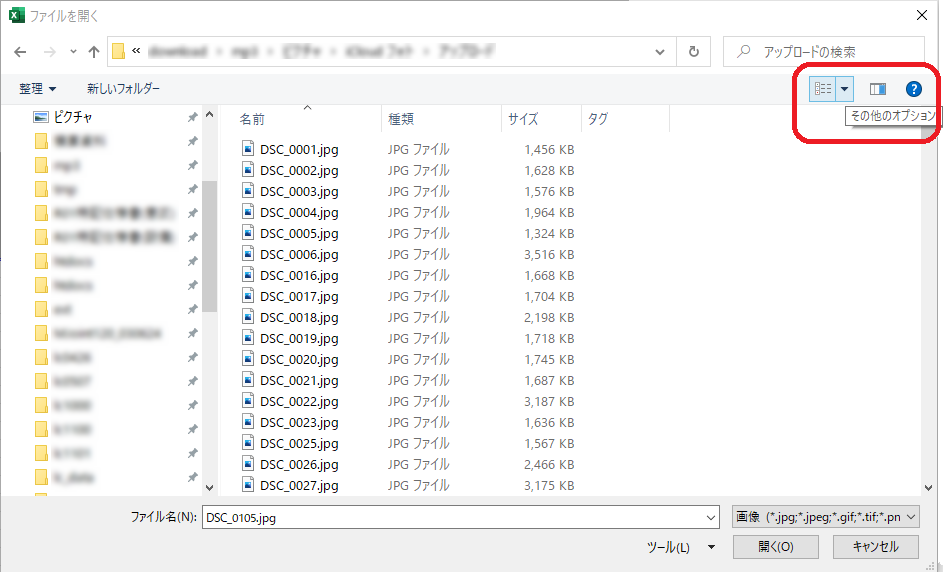
- ファイルの表示を「詳細」に変更します。
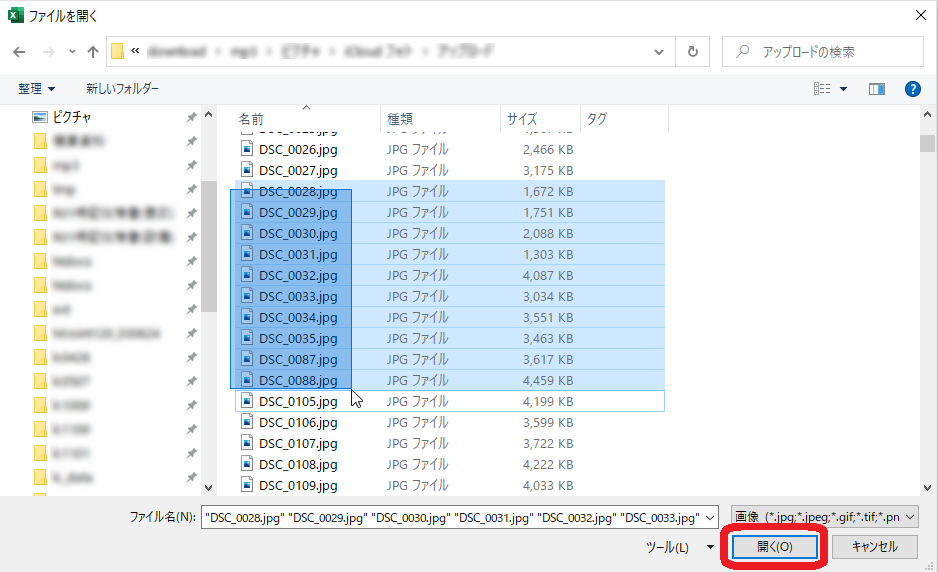
- 撮影日付を確認しながら、貼付写真のファイル名をマウスをドラッグして選択して「開く」ボタンをクリックすると、選択した写真が一気に貼り付けされていきます。CTRL+Aで全選択、CTRL+マウスクリックで個別選択が可能です。
- 1.の手順で選択した工事種別に連動して工事写真台帳の各項目が変化します。
セキュリティ:
ダウンロードしたマクロ付きファイルを開く時に「セキュリティに影響を及ぼす可能性のある問題点が検知されました。」のメッセージと共にマクロの実行がブロックされる場合があります。次の手順を読み、使用できるようにします。
- 「マクロを無効にする(D)」をクリック後にマクロ付きファイルが開きますので、何もせず、そのまま閉じてください。
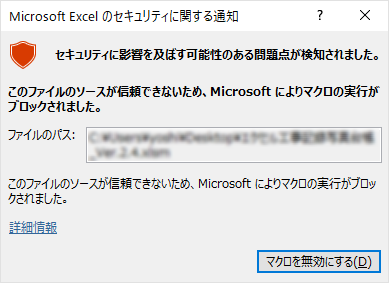
- 1の手順でマクロ付きファイルを閉じずに続行すると、次のメッセージが現れます。OKボタンを押した後、マクロ付きファイルを閉じてください。

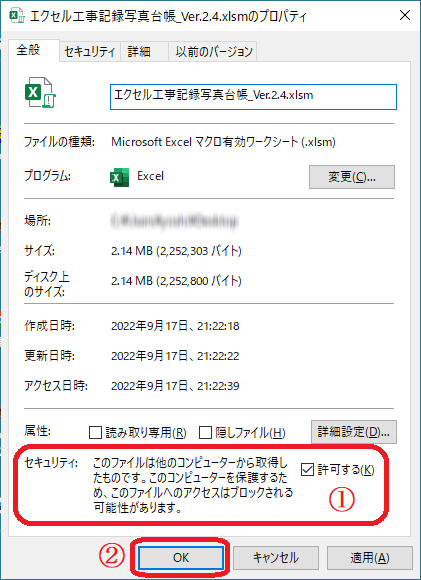
- 次の手順でマクロ付きファイルが使用できるように設定します。
(1)マクロ付きファイルのプロパティを開きます。
(2)「許可する(D)」の項目にチェックを入れます。
(3)「OK」ボタンをクリックします。
(4)マクロ付きファイルをクリックします。
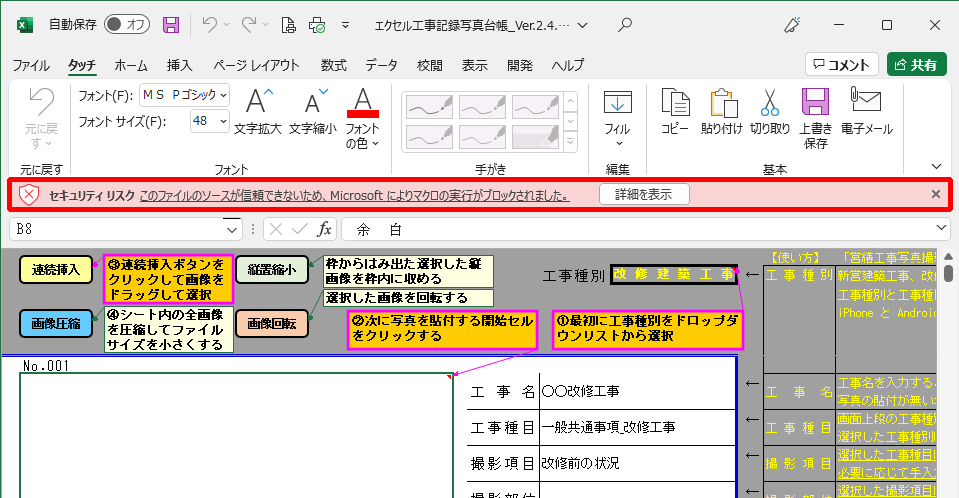
- ダウンロードしたマクロ付きファイルは3.の手順を踏まないと毎回次の図のような赤枠内のメッセージが現れます。
Ver.2.5: フィルタ機能の追加
Ver.2.4: ボタンの追加。
Ver.2.3: 令和3年改定に合わせて見直しした。
Ver.2.2: 機械設備工事のドロップダウンに撮影要領を加えた。(Thanks to @alcoholic0313)
Ver.2.1: マクロ起動をボタン化した。
感想はツイッターでお願いします。
技術データ
| Next Version Feature | |
|---|---|
| 使いかた: | |
| 1.使う前に次の手順を踏んでください。 | |
| 1)電子メールで受信したファイルのため、ネットワーク経由で受信したファイル云々で | |
| 直ぐに開けない場合がありますので、次の手順で原因を解除して使用してください。 | |
| 2)マクロを用いているため、パソコン内に保存後、ファイルを右クリックしてプロパティを | |
| 選び、プロパティ画面下段の「セキュリティ」の欄の「許可する」にチェックを入れて | |
| ください。 | |
| 次の手順で使用してください。 | |
| 2.シート名「ひな形」の複写 | |
| 1)セル番地F3の「ひな形複写」をクリックする。 | |
| 2)「ひな形 (2)」というシートが出来上がるので、シート名を例えば今日の日付20230323の | |
| ように修正する。 | |
| 3)20230323のシートが開くので、次の3.の手順を続けてください。 | |
| 3.写真の貼り付け方 | |
| 1)現場写真を撮影したフォルダにエクセルファイルをコピーする。 | |
| 2)写真を貼り付けたい「余白」(セル番地B7)を1回クリックする | |
| 3)セルB1の「連続挿入」のボタンをクリックする。 | |
| 4)現場写真を撮影したフォルダが自動で開く。 | |
| 5)CTRL + A で写真全てを選択した後、OKボタンを押す。 | |
| 6)選んだ写真すべてエクセルファイルに自動で貼り付けられる。 | |
| 7)写真は自動で解像度を落とすので、ファイルサイズは十分の一くらいに下がる。 | |
| 4.項目の入力方法 | |
| 1)セル番地K2の新営建築工事をクリックする。 | |
| 2)該当する工事種別を選択する。(今回工事は撤去・解体工事を選択) | |
| 3)工事名に今回工事名を手入力する。 | |
| 4)工事種目・撮影項目・撮影部位施工状況は工事種別(撤去・解体工事)と連動しているので | |
| 工事種目のドロップダウンメニューから「一般共通事項_解体工事」を選ぶ。 | |
| 5)撮影項目は「解体前の状況」を選ぶ | |
| 6)撮影部位施工状況は、解体前の状況(敷地、周辺施設、解体施設)、地中埋設物の状況(着工前)を選ぶ。 | |
| 7)撮影日付は写真を貼り付けた時に自動で書き込まれている。 | |
| 8)立会者名受注者名は、手入力する。 | |
| 9)その他は、完成検査の検査職員が見て、分かるように写真の説明を記入をしておく | |
| 10)その他の欄の下に写真のファイル名が自動で記載されているので、3、7)の操作で粗くなった写真はファイル名を元に確認する。 | |
| 5.フィルタ | |
| 1)工事名、工事種目、撮影項目、撮影時期のいずれかをクリックすると、撮影した写真のフィルタリングが出来る。 | |
| 2)1日に複数現場を掛け持ちした時、日付フォルダにすべて写真を入れて、台帳に貼り付けて情報を正確に記入しておくことで現場名や日付で仕分けした工事写真台帳が完成する。 | |
| 6.ページ内移動 | |
| 1)一度に多数の写真を貼り付けられるため、ページ最後にスクロールする代わりに「最終」ボタンをクリックする。 | |
| 2)先頭に戻る場合は「先頭」をクリックする。 |
